

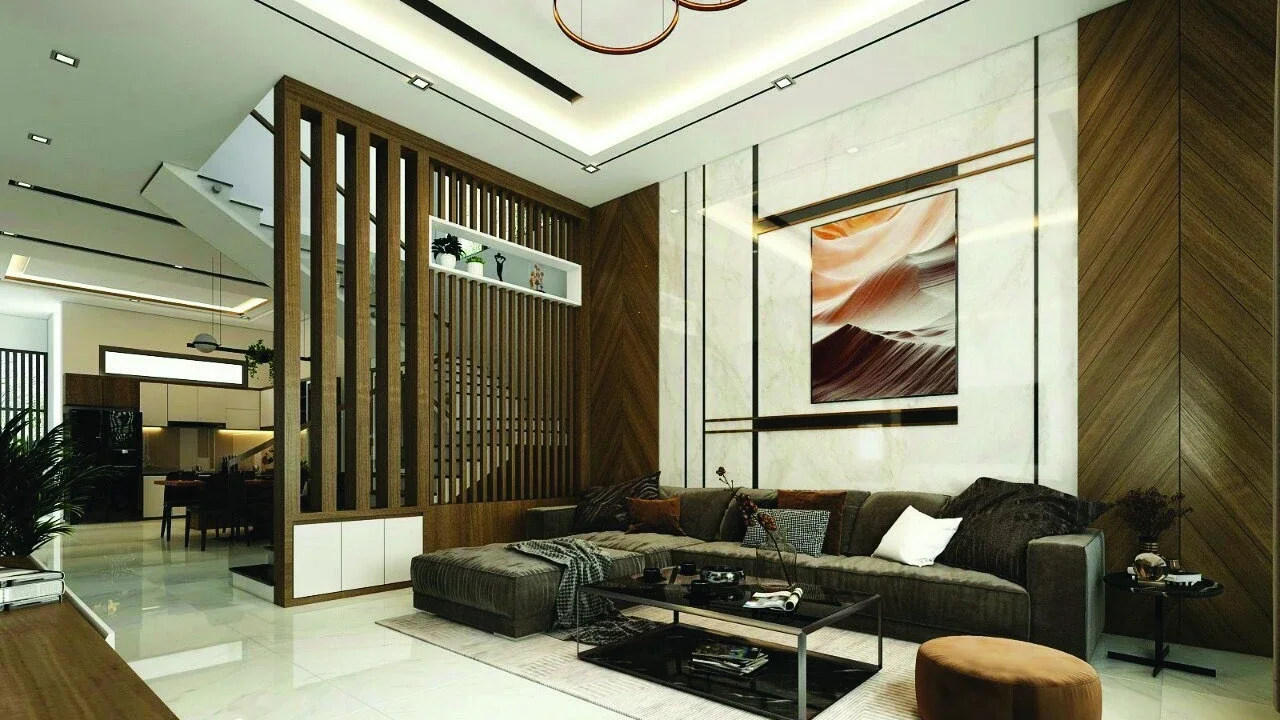
A fluted TV feature wall is the most requested residential application we supply, and also the one where the panel is the easy part. Screen position, bracket backing, cable routing and lighting all have to resolve before a single board goes up, because every one of them lives behind the finish.
So this guide works through a media wall in the order a fit-out actually happens: proportions, setting out, services, lighting, then finish. It assumes the product itself is familiar. If not, our guide to what PVC fluted wall panels are covers the geometry first, and fluted wall panel design covers the wider design principles.
We manufacture these profiles, so the notes below reflect what comes back from site as much as what looks good on a drawing.
What a fluted TV feature wall has to do
A media wall carries three jobs at once, and they pull against each other.
It has to look composed with the screen off, which is when most people see it. It has to disappear when the screen is on, so nothing competes with the picture. And it has to hide a bracket, a power supply, a set-top box and a fistful of cables while keeping all of them reachable later.
Fluted panelling answers the first two well. Vertical relief gives a blank wall something to do when the television is dark, and a mid-to-dark finish recedes once the picture is lit. The third job is where planning matters, because a hollow panel cannot carry a screen and a closed wall cannot be re-cabled.
Proportions on a fluted TV feature wall
Most media walls fail on proportion rather than on material.
Start with the screen height. A comfortable seated eye line sits roughly 1,050 to 1,150 mm above finished floor, and the centre of the screen should land close to it. Mounting a large television at 1,400 mm because that is where the bracket holes fell produces a wall that reads top-heavy and a neck ache to go with it.
Then decide how much wall the panelling takes. A panelled field that stops a few centimetres outside the screen looks like a mistake. Either run the panels the full width and height of the wall, or frame a deliberate bay that is clearly wider than the screen on both sides. Half-measures read as indecision.
Leave breathing space around the screen. As a working figure, allow at least one third of the screen width of clear panel each side. The television then sits within the composition rather than filling it. Where a console sits below, leave a clear gap between the unit and the screen rather than stacking them tight.
Setting out a fluted TV feature wall
Setting out is the ten-minute decision that separates a wall that looks designed from one that looks assembled.
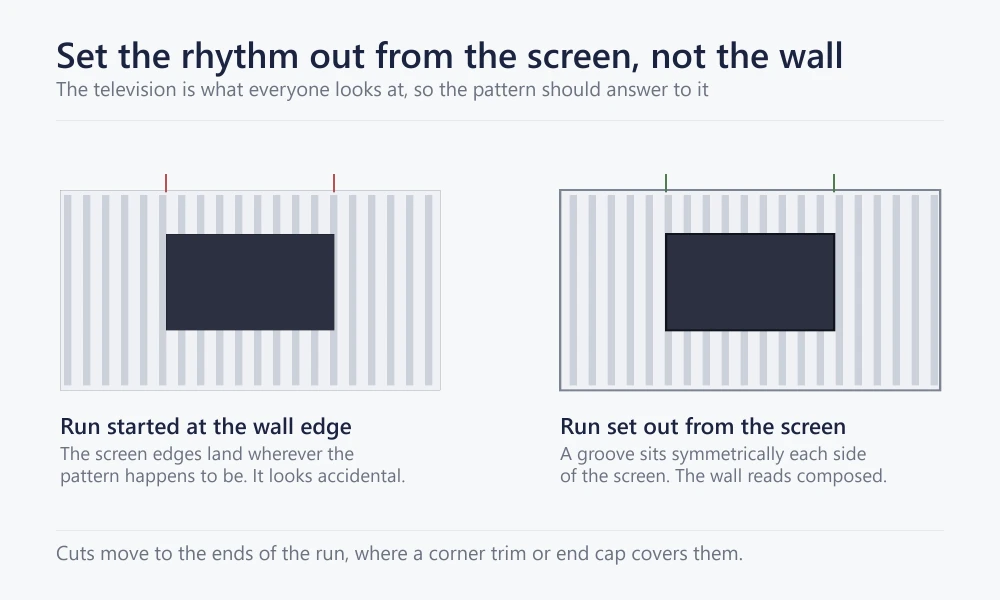
The instinct is to start the panel run at one edge of the wall. That leaves the screen sitting wherever the pattern happens to be, so a groove may land two centimetres inside one edge of the television and eight inside the other. Nobody can name the problem, but the wall looks slightly wrong.
Set out from the screen instead. Position the run so the rhythm falls symmetrically about the screen centre line. The cut boards then land at the ends of the wall, where a corner trim or an end cap covers them. On a 205 mm board a full-width adjustment costs at most one board, and the difference is visible from the sofa.
Mark the screen centre line on the substrate before any panel goes up, and keep it marked. It is the reference for the bracket, the sockets and the panel run, and all three have to agree.
What has to sit behind the panels
This is the section that saves the callback.
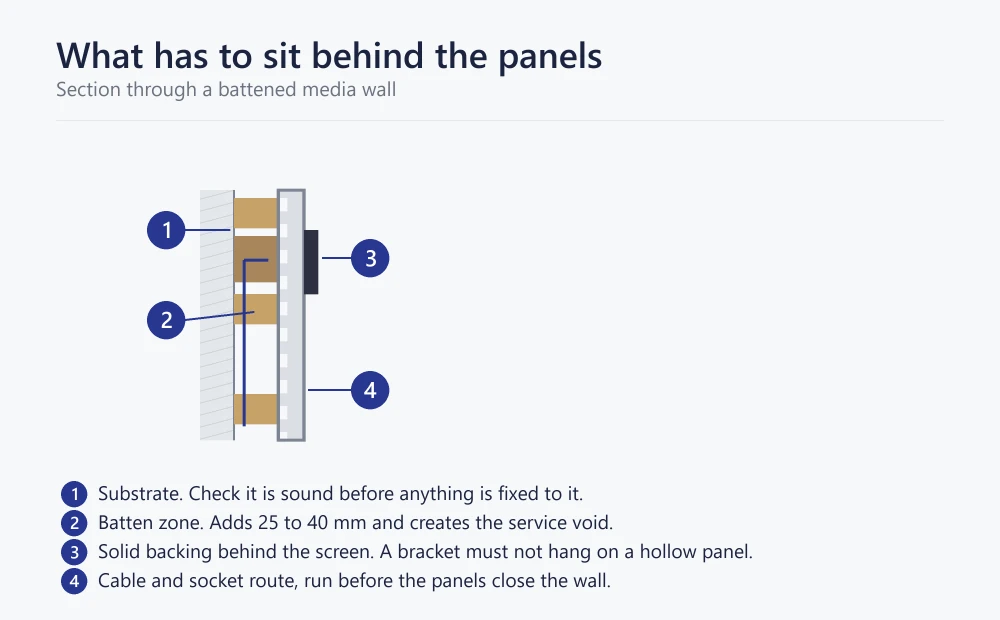
A television bracket must never hang on a hollow panel. Fix a solid backing plate to the substrate across the whole bracket zone, sized generously so the fixing position can move later. Plywood works, and it should be wide enough to cover two possible bracket widths rather than the one on today’s television.
Battens create the void that makes a media wall practical. They add 25 to 40 mm of depth depending on the batten. In exchange they give a route for power, aerial and HDMI, plus room for a bracket recess if the screen sits close to the wall. Check door reveals and skirting returns before committing to that depth.
Run every cable before the panels close the wall, and run one more than you think you need. Bring the outlets out at the screen centre line, so the plates sit behind the television rather than beside it. Add a second outlet low down for the console. Where a cable passes through the void, use cable rated for in-wall use and keep power and signal separated.
Our installation guide covers the fixing sequence in more detail, and the same substrate and batten principles apply to fluted boards.
Lighting a fluted TV feature wall
A fluted surround wants grazing light. A screen wants none. Resolving that is the whole lighting problem.
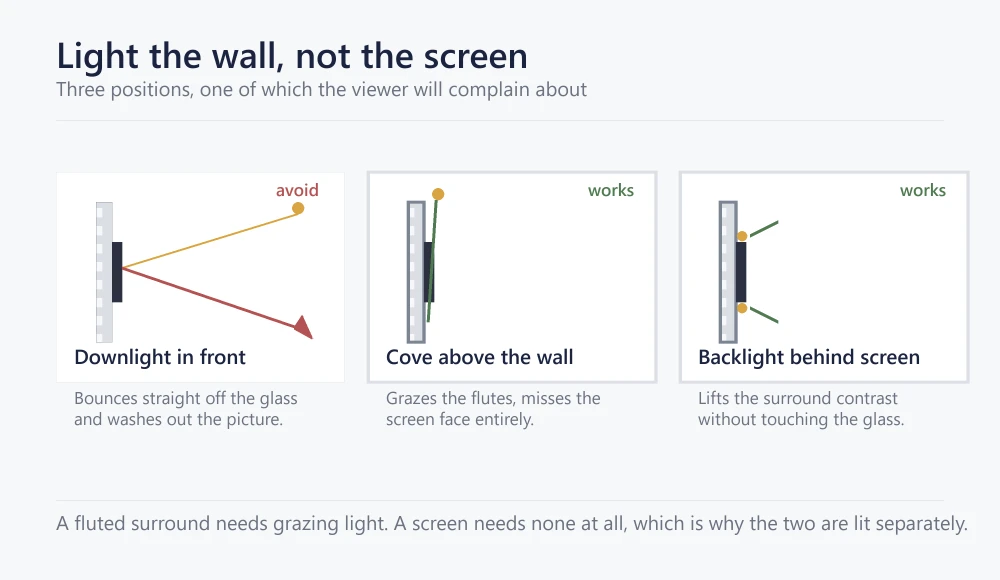
A downlight in the ceiling in front of the wall is the common mistake. It throws light onto the glass, the reflection lands in the viewer’s eye, and the picture washes out in exactly the scene the viewer cared about. Move that fitting, or leave it out.
A cove above the panelling works, because the beam runs down the face of the wall and never reaches the screen. So does a backlight fitted behind the television itself, which lifts the contrast of the surround and makes the picture easier to watch in a dark room. Ambient conditions for viewing a flat panel display, including surround luminance, are set out in ITU-R BT.2022.
Put the surround lighting on its own circuit. A media wall needs bright light when someone is cleaning it and almost none when a film is playing, and one switch cannot serve both.
Choosing a profile for a fluted media wall
Living rooms take a narrower range of profiles than commercial work. Viewing distance is short, and the light is usually soft.
On depth, the low profiles usually win. Our 15 mm 3-groove board reads as texture from across a room and holds a shadow under normal domestic downlighting. The 27 mm deep board is superb under a cove, and disappointing without one, so specify it only when the lighting drawing confirms grazing light.
On pitch, a screen wall benefits from a calmer rhythm. The 3-groove boards place a line every 65 mm, which sits comfortably behind a television. The 41 mm 5-groove rhythm can start to vibrate against the screen edge at close viewing distance, particularly in a light finish.
On finish, mid-to-dark tones do the most work. A dark film compresses the difference between rib and groove, so the wall reads as depth rather than stripes, and it stops competing with the picture. Very pale finishes push the groove into a hard line that stays visible in a dark room.
Combining panels with joinery and storage
Few living rooms want a panelled wall and nothing else, so the junction with joinery needs designing.
The cleanest arrangement runs the panelling floor to ceiling and lets a floating unit sit in front of it, so the rhythm passes behind the furniture uninterrupted. The alternative stops the panelling above a full-height media unit, in which case the two need a deliberate shadow gap or a trim rather than a butt joint.
Where storage doors sit within the panelled field, decide early whether they should disappear or read as doors. Matching the door finish to the panel film hides them; contrasting them makes a feature. What rarely works is a near match, because the eye reads it as a defect rather than a decision.
Keep a service route to anything that needs it. A closed panel over a router or an amplifier is a problem waiting for a hot afternoon.
Where the panelling should stop
Every free edge of a fluted run exposes an open groove, so the perimeter needs profiles rather than improvisation.
An internal corner trim closes a run where it meets a return wall. Turning outward around a chimney breast calls for an external corner instead. Where a run simply stops mid-wall, an end cap finishes it, and skirting and cornice close it at floor and ceiling. All of them should come from the same finish code as the boards, which is why we laminate our trim profiles in the same films.
Think about the chimney breast case specifically, since it turns up constantly in living rooms. Cladding the breast and leaving the flanking alcoves plain is a strong, economical move, and it needs two external corners done well rather than four walls done adequately.
Common fluted media wall mistakes
- Hanging the bracket on the panel. A hollow board is a finish, not a structure. Fix to a backing plate.
- Mounting the screen too high. Bracket convenience is not a design reason.
- Starting the run at the wall edge. The rhythm then lands randomly against the screen.
- One cable route. Devices change; the wall does not reopen easily.
- Downlights in front of the screen. The single most common lighting complaint.
- Deep flutes with flat light. Paying for 27 mm and lighting it head-on wastes both.
- Panelling that stops just outside the screen. Either commit to the field or frame a proper bay.
- Leaving trims to site. Open groove ends at the perimeter undo everything else.
Frequently asked questions
How do you plan a fluted TV feature wall?
Fix the screen height and size first, then the panelled field around it, then set the panel rhythm out from the screen centre. Add the backing plate, cables and lighting positions before any board is fitted.
Can a television be fixed straight to fluted panels?
No. The boards are hollow and they finish a wall rather than support load. Fix a solid backing plate to the substrate behind the bracket zone and hang the screen from that.
Which profile suits a living room best?
Usually a low profile at a calmer pitch, such as a 15 mm 3-groove board. Deep relief works beautifully under a cove and underwhelms under ordinary ceiling downlights.
What colour works behind a television?
Mid to dark tones. They recede when the picture is on and still show relief when it is off. Very pale finishes leave a hard groove line that stays visible in a dark room.
Should the panelling run the full wall or just behind the screen?
Full wall, or a bay clearly wider than the screen. A panelled patch that stops slightly outside the television reads as an error rather than a choice.
How much extra depth does a media wall need?
Battens add roughly 25 to 40 mm before the panel thickness. Check door reveals, skirting returns and any adjacent joinery before settling on the build-up.
Final perspective
A fluted TV feature wall is a services problem wearing a finish. The panel choice matters. But the decisions that make the wall work all happen before the boards arrive: where the screen sits, what carries its weight, which cables run, and where the light comes from.
Get that sequence right and the panelling does what it is good at. It gives a dark rectangle something to sit against. It holds a rhythm the eye enjoys when the room is quiet, then steps back the moment the picture starts.
If a living room scheme is on your desk now, browse the fluted and slat range or talk to our team about a project. For the specification decisions behind a fluted order, see choosing a fluted profile.