

Most of the work needed to install PVC wall panels happens before anyone opens a pack. Substrate condition, setting out and trim planning decide how the wall looks, whereas the fixing itself is usually the quickest part of the day.
So this guide follows a fitter’s order: check the wall, choose a fixing method, set out, cut, fix, then close the edges. It also flags the mistakes that only become visible once the scaffold comes down. If you want the product explanation first, we cover panel structure and materials separately.
Read the supplier’s instruction sheet first
One thing has to be said before any method appears on this page. The guidance below is general trade practice for panelised interior cladding, and it is not a substitute for the instruction sheet that comes with a specific product.
Adhesive type, batten spacing, fixing centres and expansion allowance are all product-specific numbers. They differ between manufacturers and sometimes between profiles from the same manufacturer. Our own warranty makes this explicit: it applies where an authorised technician has installed the product following PHARAON technical guidance, so a crew working from general advice alone puts the cover at risk.
Therefore treat this article as background that helps you ask better questions, then work to the document that arrives with the boards.
What to check before you install PVC wall panels
Five checks take twenty minutes and prevent most callbacks.
- Is the wall dry? Panels are not a damp-proofing layer. A wall with a moisture source needs that source fixed first, because trapping damp behind a board makes the problem invisible rather than absent.
- Is it flat enough? Boards bridge small irregularities, not bumps. Run a long straightedge across the wall and look for daylight; anything beyond a few millimetres over two metres points towards battens rather than direct adhesive.
- Is it sound? Loose plaster, flaking paint and dusty surfaces all defeat adhesive. Scrape back to something solid, or fix mechanically instead.
- Where are the services? Mark cables and pipes before anything covers them. Battens make this easier, since they create a void the services can run in.
- Are the boards acclimatised? Thermoplastics move with temperature. Leave packs flat in the room for a day so boards fit at the temperature they will live at.
Do not skip the last one. A board fitted cold and then warmed will push against its neighbours, and a wall installed on a hot afternoon can open small gaps overnight.
Tools, and what each one has to do
The list is short. A fine-tooth saw or a mitre saw with a blade for plastics handles the cuts, while a utility knife scores and snaps thin sections. A tape, a long spirit level and a chalk line cover the setting out.
Beyond that you need whatever the fixing method requires: a cartridge gun for adhesive, a driver and clips or staples for battens, or a driver and screws for a mechanical fix. A rubber mallet and an offcut block help seat boards without marking the face.
Blade choice matters more than tool choice. A coarse blade tears the film at the cut edge, and a torn edge shows wherever a trim does not quite cover it.
Setting out: the step that decides the result
Setting out is where a wall is won. It takes ten minutes and it cannot be corrected later without stripping the run.
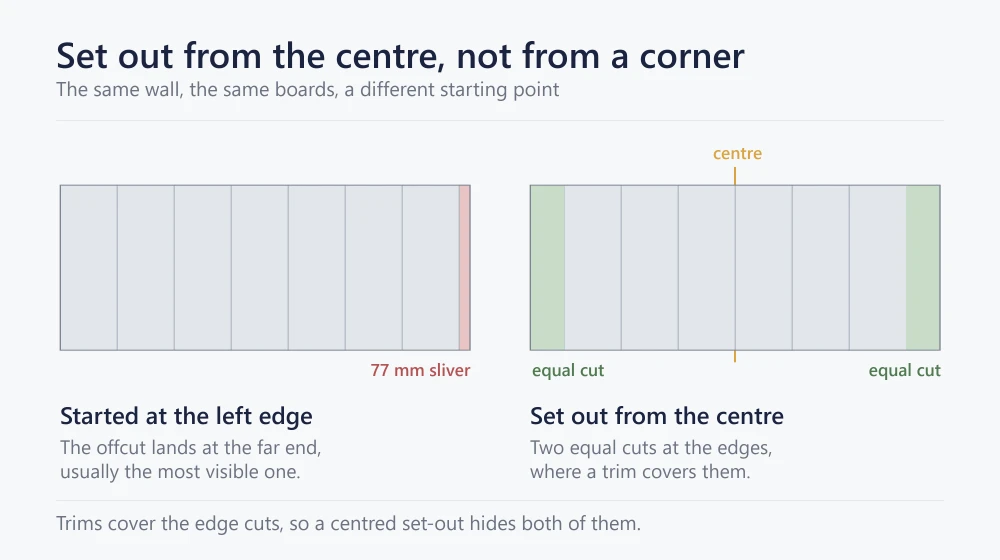
Start from the visible centre of the wall rather than from a corner. If a run simply begins at one edge, the final board usually lands as a narrow sliver at the most visible end. Setting out from the centre pushes equal cuts to both edges, where a corner trim or an end cap covers them anyway.
Then establish plumb. A wall that is out of square will throw a vertical run progressively off, so mark a true vertical line with a level and work from it rather than from the corner of the room. Check every third or fourth board against that line, because a small lean compounds across a long wall.
How to install PVC wall panels on a flat wall
Direct fixing suits a wall that is already flat, dry and sound, and it is the fastest option because it adds no depth.
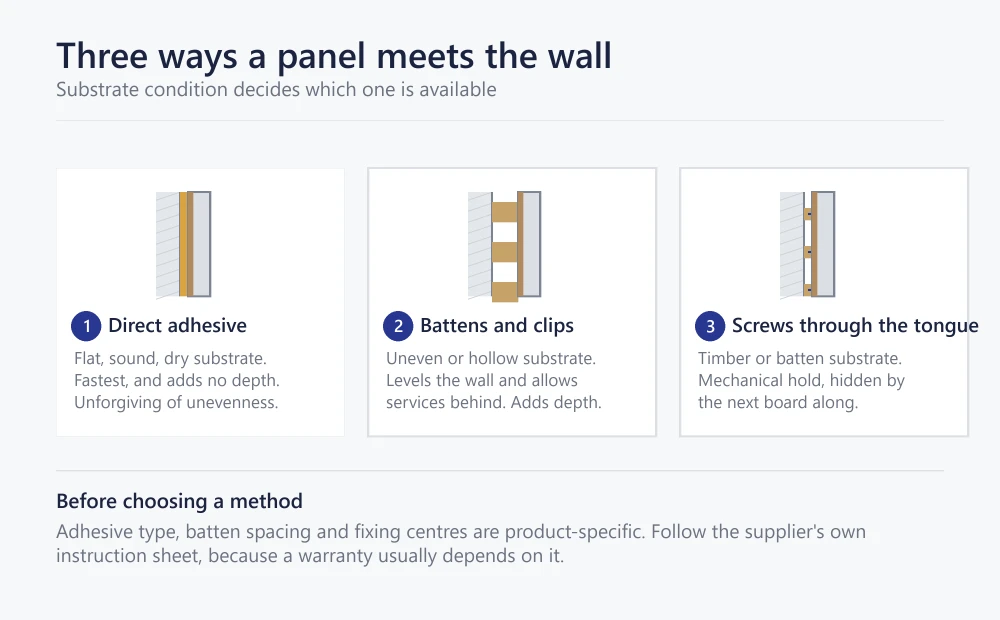
Work in this order. Fit the perimeter trims that need to go on first, usually the internal corner or the end cap, since a board cannot slide into a trim added afterwards. Apply adhesive to the back of the board in the pattern the manufacturer specifies. Offer the board up to the setting-out line, press it home, then check it for plumb before the adhesive grabs.
Each following board engages the groove of the one before it. Push it fully home by hand, and tap it with a mallet against an offcut block if it resists. Never force a joint, because a joint that needs force is telling you something is out of line further back.
How to install PVC wall panels on battens
Battens solve two problems at once: an uneven wall and a need to run services behind the finish. They cost depth, usually 25 to 40 mm depending on the batten, so check door reveals and skirting returns before committing.
Set battens perpendicular to the panel direction. Vertical boards therefore need horizontal battens, and horizontal boards need vertical ones. Level each batten as it goes on, packing behind it where the wall falls away, since the batten face is now the surface the panels follow.
Fix boards to the battens through the tongue with clips, staples or screws, so the next board conceals the fixing. Batten spacing and fixing centres come from the manufacturer’s sheet rather than from habit, and they change with panel thickness.
Cutting panels cleanly
Cut with the decorative face upward on a hand saw and face downward on a circular or mitre saw, so the blade exits through the back rather than tearing the film.
Support the board along its length. A hollow-profile board flexes, and an unsupported cut wanders. Cut slightly long and trim back rather than cutting tight, because a board cut short cannot be recovered.
Finally, deburr the cut edge. A quick pass with a blade or fine abrasive removes the ridge that would otherwise stop the next board seating fully.
Corners, stops and the trims that close them
Every panel run ends somewhere, and each ending needs a profile. Planning them at setting-out stage is what separates a finished wall from an almost-finished one.
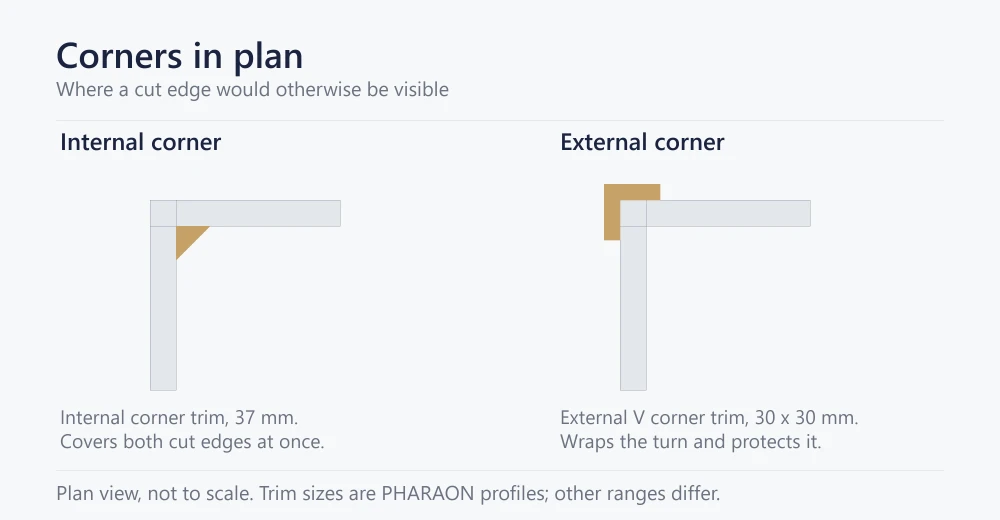
An internal corner trim closes the joint where two clad walls meet inward, covering both cut edges at once. An external V corner trim wraps a wall turning outward and protects an edge that would otherwise take knocks. An end cap closes a run that simply stops against a plain wall. At floor and ceiling, skirting and cornice do the same job horizontally.
Order trims with the panels, in the same finish code, as our guide to choosing a specification sets out. A trim from a different film batch reads as a defect rather than as a contrast, and it is the single most common way a good installation is spoiled at the last step. Our range sits under trims and mouldings.
Ceilings, and what changes
Ceilings follow the same sequence with two differences. Weight matters, so a lighter flat board is usually the right specification, and support spacing tightens because gravity works against the fixing rather than with it.
Work from one edge towards the light source where possible, since a joint viewed against the light shows more than one viewed with it. Use more temporary support than feels necessary, because a board that sags while the adhesive cures stays sagged.
Movement, gaps and why they matter
Thermoplastics expand and contract with temperature, and a long uninterrupted run moves more than a short one. Manufacturers determine the figure by test methods such as ISO 11359-2, so ask for the coefficient rather than guessing at it.
Leave the expansion allowance the manufacturer specifies at the ends of runs, and let trims cover it rather than filling it with sealant. A run fitted tight between two hard stops has nowhere to go, so it bows at the weakest joint when the room warms.
Keep panels clear of heat sources too. Hobs, ovens, flues and unshaded glazing all need the separation the appliance or the specification calls for.
Common installation mistakes
- Starting at a corner. Produces a sliver at the far end, in the most visible position.
- Working from the room rather than from a plumb line. A wall out of square drags the whole run with it.
- Forcing joints. Force hides a setting-out error rather than fixing one, and it can damage the tongue.
- Fitting trims last. Some trims have to go on before the boards they receive, so plan the order.
- Mixing packs without checking. Compare boards from separate packs before fitting, not after.
- No expansion allowance. The wall looks perfect on the day and bows in the first warm week.
- Coarse saw blades. A torn film edge cannot be repaired, only covered.
Frequently asked questions
How do you install PVC wall panels?
Check and prepare the substrate, fit the trims that go on first, set out from the centre with a plumb line, then fix each board with adhesive, clips or screws so the next board conceals the fixing. Close the edges with corner trims, skirting and cornice.
Can you install PVC wall panels over tiles?
Often yes, provided the tiles are sound, dry and flat. Tap them for hollow spots first, because a loose tile takes the panel with it. Where several tiles are suspect, batten over them instead.
Do you need battens?
Only where the wall is uneven, hollow or has services to conceal. A flat, sound, dry wall takes a direct fix, which is faster and adds no depth.
Which direction should boards run?
Vertical runs make a room read taller and suit full-height walls. Horizontal runs widen a space visually, although they need more care where a run meets a door or window reveal. Our guide to cladding space by space covers the design side.
How long does installing PVC wall panels take?
Far less than a wet finish, since there is no drying time between coats. Actual duration depends on wall area, board width and how much cutting the room demands, so treat any single figure with suspicion.
What happens if a board is damaged later?
A single board can usually come out and be replaced without disturbing the whole run. Keep two or three spare boards per finish on site, because a replacement from the original batch always matches better than a fresh order.
Final thoughts
Crews who install PVC wall panels well tend to spend their time differently from crews who do not. They spend longer on the wall check and the setting out, and less time on the fixing, because the fixing is the part that goes quickly once everything before it is right.
Three habits carry most of the quality. Set out from the centre against a plumb line. Order trims with the boards in the same finish code. Follow the manufacturer’s own numbers for adhesive, spacing and expansion rather than working from memory.
If you need the product-specific instruction sheet for a PHARAON panel, or a specification checked before it reaches site, talk to our technical team. You can also browse the full panel and trim range.