

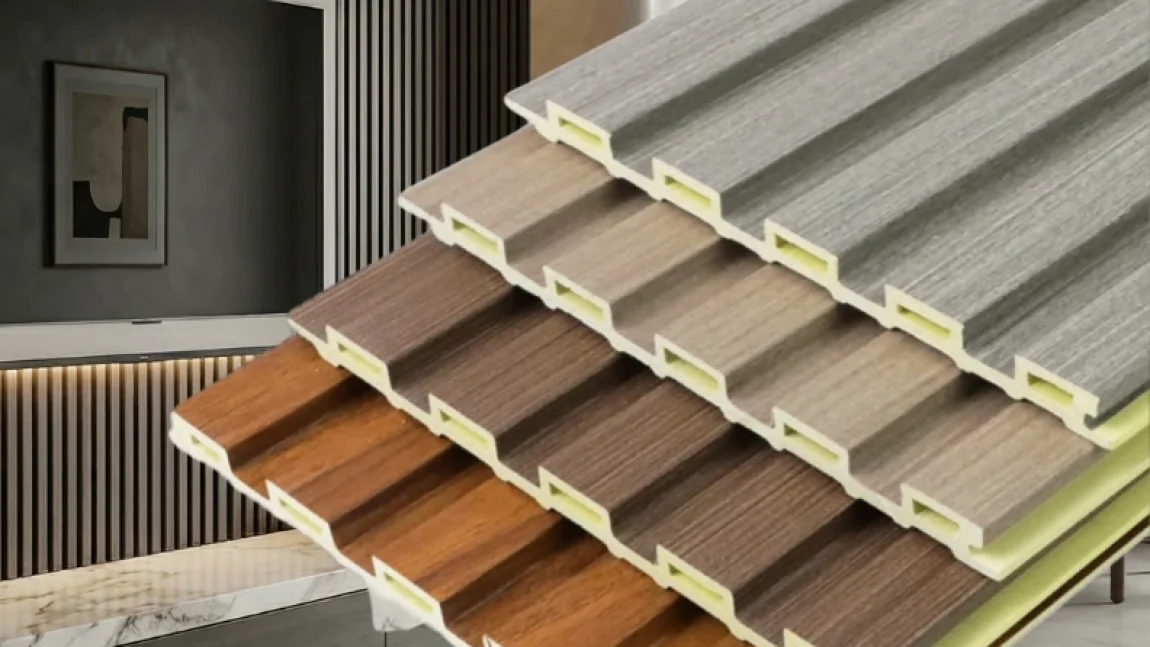
Learning how to choose fluted wall panels takes longer than choosing flat ones, because two extra variables come into play. Pitch and depth both have to answer to the room before the finish matters at all, and neither can be corrected once the boards are up.
So this guide runs the decisions in an order that keeps them from colliding: room first, then pitch, depth, format, finish, trims and quantity. It closes with the sample and the paperwork worth asking for. Our general specification framework covers the decisions common to every panel type, and this article covers what changes when the face is grooved.
We extrude these profiles, so the sequence below is the one our own technical team walks through with a specifier.
What makes a fluted panel a different purchase
Three things separate a fluted order from a flat one, and all three cost money if they surface late.
Coverage is the first. A fluted board covers 0.585 to 0.615 m² against 1.2 m² for a 400 mm flat board, so the same wall takes roughly twice the boards, twice the handling and twice the joints.
Tolerance is the second. Repeated geometry gives a manufacturing error nowhere to hide, which our guide to what PVC fluted wall panels are covers in detail. A two-millimetre width variation vanishes on a flat wall and breaks the rhythm on a fluted one.
Lighting dependency is the third. A flat panel looks much the same under any light. A fluted panel has a range, and a deep profile lit head-on delivers less than a shallow one costing considerably less.
Before you choose fluted wall panels, settle the room
Four properties rule options in or out before anyone opens a sample book.
- Lighting position. The single most important input. Grazing light from a cove or a wall washer justifies depth; flat frontal downlighting does not.
- Viewing distance. A wall people pass at arm’s length shows every groove. A wall seen from six metres reads as tone.
- Room volume. Deep relief in a low room reads as a heavy dark mass. Shallow relief in a double-height space can disappear.
- Conditions. Dry interior walls only, away from direct sunlight. Our warranty excludes both exterior use and sustained direct sun.
Settle those four and the rest of this article applies. Where the space fails one of them, no specification detail rescues it.
Step one: choose fluted wall panels by pitch
Pitch is the distance from one groove to the next, and it decides how fine the rhythm reads.
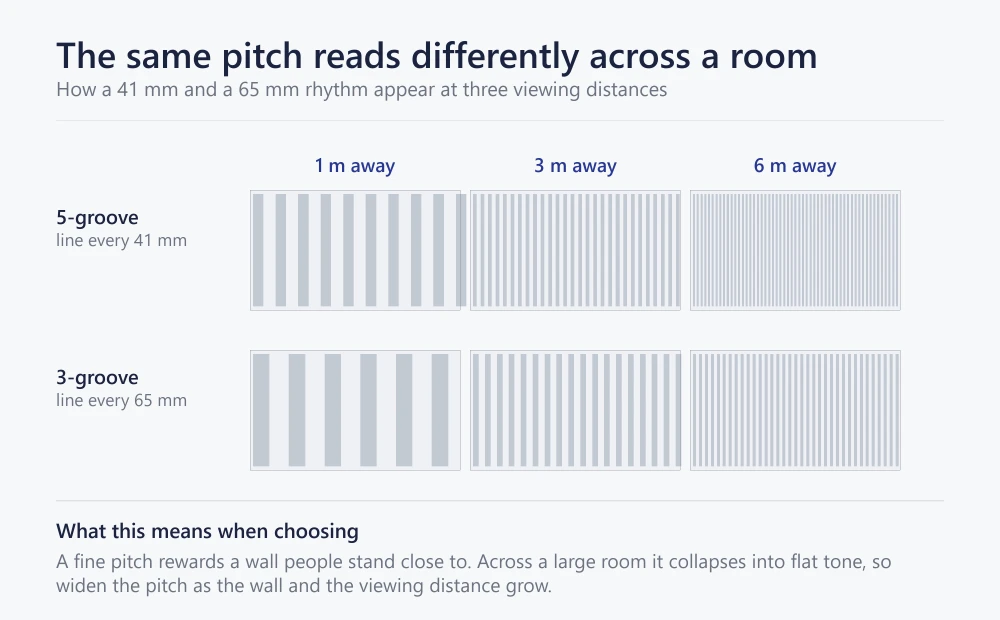
Our 5-groove boards place a line every 41 mm across a 205 mm face. That is the tightest rhythm we produce, and it rewards a wall people stand close to: a reception desk front, a lift lobby, a bar counter.
The 3-groove boards space lines every 65 mm across 195 mm. The rhythm reads calmer and carries further, which suits feature walls seen from across a room and larger elevations generally.
A working rule is to widen the pitch as the wall and the viewing distance grow. A fine 41 mm rhythm across an eight-metre lobby wall turns into flat grey texture, while the same profile behind a desk reads as precision.
Step two: choose fluted wall panels by depth
Depth decides intensity, and it answers directly to the lighting drawing.
We extrude four depths. The 12 mm 5-groove board is the shallowest with grooves, which makes it the natural ceiling and soffit option where projection is being counted. The 15 mm 3-groove board reads as texture from across a room and holds a shadow under ordinary downlighting. At 22 mm the 5-groove deep board keeps a fine rhythm while gaining real relief, and the 27 mm 3-groove board throws the strongest shadow line we make.
Match depth to the light rather than to the mood board. Under a cove, the 27 mm board is transformative. Under flat ceiling downlights it costs more than the 15 mm board and delivers less, because the shadow it was designed to cast never forms.
Two practical notes. The 27 mm profile projects further than a standard 3 mm shadow gap can absorb, so allow a deeper reveal where it meets plaster. And the 12 mm board is the thinnest we make, which makes it the easiest to follow a gentle radius.
Step three: choose fluted wall panels or slat boards
A decision people often miss is whether they want a fluted board at all, or a slat board that produces a similar look by different means.
A fluted board carries grooves extruded within a single 195 or 205 mm face. A slat board is 125 mm wide and produces a genuine board joint roughly every 12 cm. Both give vertical rhythm, but the line is a groove in one case and a joint in the other.
That difference matters in three ways. Joints are more sensitive to setting out than grooves, because a joint that drifts is a visible gap rather than a shadow. Slat boards follow a curved or faceted wall more closely, since the segments are shorter. And a slat wall shows any width variation between boards immediately, whereas a fluted board hides small variation inside its own rhythm.
Step four: choosing the finish
Once you choose fluted wall panels by pitch and depth, the finish is a free variable, since the film is laminated after extrusion. Our fluted boards draw on the same ZICO range as the flat panels.
Tone changes how the profile reads. Dark films compress the difference between rib and groove, so the wall registers as depth. Pale films widen that difference, so the groove reads as a distinct line. Choose the tone for the effect you want, then confirm it under the actual light rather than under showroom lighting.
Grain direction matters more on fluted work than on flat. A wood grain running parallel to the flutes reinforces the rhythm, while a busy cross-figured film fights it. Quieter grains generally scale up better across a long wall.
Always specify by finish code. A description such as “walnut” means different things to different people, whereas a code identifies one production film and removes most colour disputes on delivery.
Step five: the trims that close the flutes
Every free edge of a fluted run leaves an open groove, so trims are part of the specification rather than a site decision.
Four conditions cover most schemes. An internal corner trim closes the junction where two clad walls meet. An external V corner wraps a wall turning outward. An end cap stops a run against a plain surface, and skirting and cornice close it at floor and ceiling.
Order the trims with the boards, in the same finish code. We laminate our trim profiles on the same lines and in the same films as the panels for that reason, because a near-matching trim reads as a defect rather than as a contrast.
Working out the quantity
Buyers who choose fluted wall panels for the first time are usually surprised by the arithmetic, so do it early rather than at quotation.
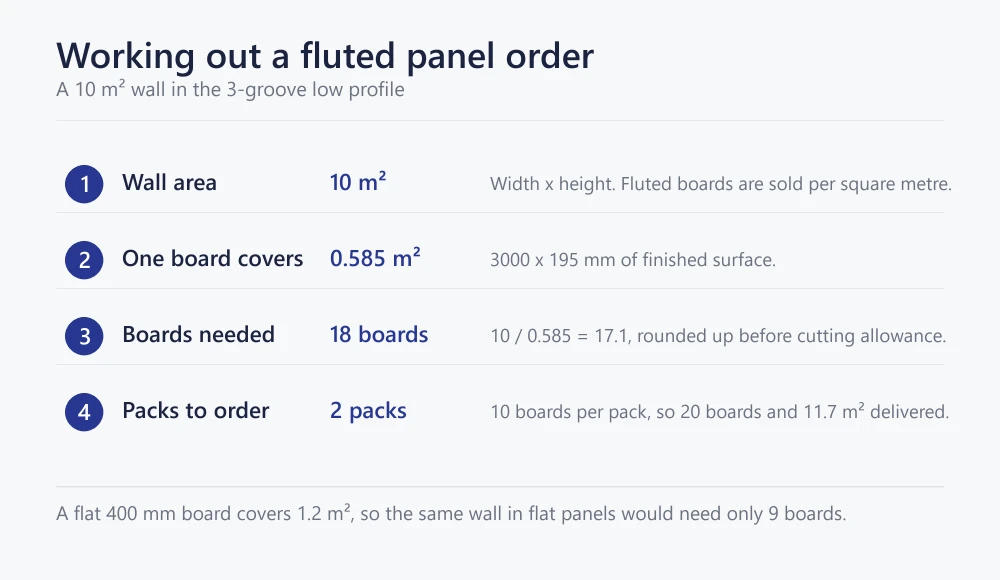
Add a cutting allowance on top. Ten per cent covers a simple rectangular wall, and more suits a room with openings, angles or a raking edge. Fluted runs generate more offcuts than flat ones, simply because there are more boards.
Order the whole quantity at once. Film batch consistency is far easier to guarantee within one production run than across two, and on a fluted wall a batch difference shows up along every line rather than at a single joint.
What to ask for in a fluted sample
A single offcut confirms the colour and nothing else. Ask for three full boards drawn from different packs, plus one length of each trim you intend to use.
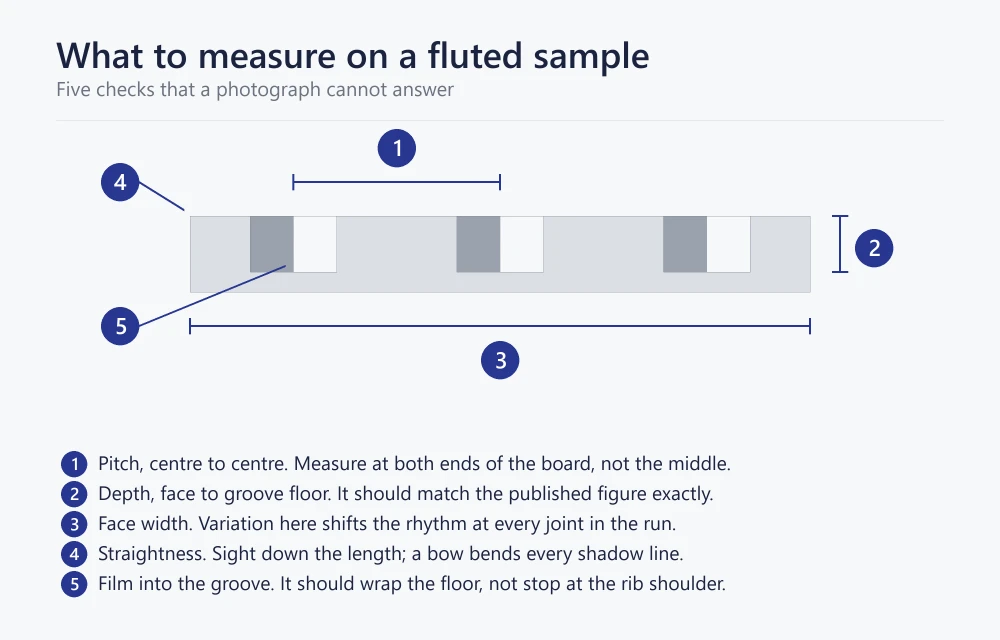
Measure pitch and depth at both ends of each board rather than in the middle, because drift along the length is exactly what a mid-board measurement misses. Compare face width between boards from separate packs. Sight down each board for straightness, since a bow that would vanish on a flat wall bends every shadow line on a fluted one.
Look into the groove floor as well. The film should wrap cleanly into the groove rather than stopping at the rib shoulder, and the groove floor should be as evenly finished as the face.
Dimensional characteristics for rigid PVC products are described in standards such as ISO 11833-1, which is a useful reference when asking a supplier what tolerance they actually declare.
Questions that separate a manufacturer from a trader
- Which groove counts, pitches and depths do you extrude yourself?
- What tolerance do you declare on pitch, depth and face width?
- How is profile pitch controlled along a board and between boards?
- How do you keep a phased order within one film batch?
- Do the trims run in the same films as the boards, on the same lines?
- What quality-control stages sit between raw material and dispatch?
- How are fluted boards packed, and what protects the rib corners?
- What certificates and test reports can you provide, and what is their scope?
- Can you supply under our own brand?
Our answer to the last one is yes, and the documents behind the others sit on our certifications page rather than in a summary.
A fluted specification checklist
Everything above condenses into six lines. A specification that answers all six is ready to quote against.
| Decision | Options | Decide it on |
|---|---|---|
| Pitch | 41 mm (5-groove) or 65 mm (3-groove) | Wall size and viewing distance |
| Depth | 12 or 15 mm low, 22 or 27 mm deep | The lighting position, confirmed on drawing |
| Format | Fluted grooves or 125 mm slat joints | Whether the line should be a groove or a joint |
| Finish | ZICO surface range, specified by code | Tone against the light, grain along the flute |
| Trims | Corner, end cap, cornice, skirting | Every free edge, same finish code, same order |
| Quantity | Area ÷ 0.585 to 0.615 m², rounded to packs | One production run, cutting allowance included |
Frequently asked questions
How do I choose fluted wall panels for a project?
Settle the lighting and viewing distance first, then pitch, then depth, then format, finish, trims and quantity. Request three full boards from different packs before committing, and order the whole quantity in one run.
Is a deeper profile always better?
No. Depth only pays where light grazes the wall. Under flat frontal lighting a 27 mm board looks much like a 15 mm one while costing more and projecting further into the room.
How many boards does a fluted wall need?
Roughly twice a flat wall of the same area. One fluted board covers 0.585 to 0.615 m² against 1.2 m² for a 400 mm flat board.
Can fluted and flat panels be combined?
Yes, and it is one of the more reliable moves available. Using the same finish code across both gives textural contrast without introducing a second colour.
What tolerance should I expect on groove pitch?
Ask the supplier to state it rather than assuming a figure. What matters is that they can name a number and that a sample from two different packs holds it.
Which profile suits a ceiling?
Usually the shallowest, because weight and projection both matter overhead. Confirm the ceiling structure and fixing method before committing.
Final perspective
Choosing well here is less about finding the best fluted board and more about closing the decisions in an order that stops them fighting. The lighting rules depth. Viewing distance rules pitch. The room rules whether the profile belongs at all, and the finish only matters once those three agree.
The step most often skipped is the sample. Three boards from three packs, measured at both ends and sighted for straightness, will tell you more about a supplier than any brochure, because a fluted wall is judged across its whole run rather than one board at a time.
If a project is on your desk now, browse the fluted and slat range or talk to our team about a specification. For the design side, see fluted wall panel design, and for a living room specifically, media wall schemes.